Welcome to the
Digital Onboarding hub
We’re excited to partner with you and look forward to granting access to your Amplify programs! Below, you’ll find information and resources to help guide you through setting up your Amplify products.

Timeline for Digital Onboarding at Amplify: Set-up process
Pre-Onboarding
Step 1
Complete your {{Page Name Pending}}. For more on this, see below.
Step 2
If you’re a returning Amplify user, select a rollover date and input this date into the Settings of Amplify Admin Portal (available May 14– July 16). For more info, click here
Service Planning
Step 3
Attend a Digital Onboarding webinar! During this webinar, you will learn about the entire digital onboarding process including digital roster share methods, digital rostering requirements, login options, and more! Register here.
Step 4
Share your rosters with Amplify on (or before) the date you indicated in the {{Page Name Pending}}! portal.
- Need to change this date? Be sure to update it in the {{Page Name Pending}}.
- The Amplify Team cannot begin the digital implementation process until accurate & complete rosters have been received.
Step 5
Amplify will review rosters shared to ensure the necessary enrollment requirements are met.
- If requirements are not met or there are technical complications in accepting your rosters, our Technical Onboarding team will be in touch.
Service Delivery
Step 6
Amplify will complete the licensing and digital implementation of your purchased Amplify programs. This will be completed within 10 business days after the receipt of accurate and complete rosters.
- You will receive status updates via email and a final onboarding complete notification when the licensing process is complete.
- You’re ready to launch Amplify digital products. Have a successful school year!
- CDL Information
More information coming soon!
- Auto entitlement video and template
- User ID template and guide
- Amplify Admin Portal—ALL district usage
Admin Portal is a place for all districts, no matter the rostering data source, to:
- View summaries of rosters. Teachers will see rosters of their classes. Administrators will see rosters of their campuses and/or districts.
- View program access.
- Provide staff members with access to Admin Reports.
Admin Portal as enrollment source: This is the place to manually add or batch upload rosters for staff, students and classes.
External enrollment source (Clever, Classlink, etc.): This is the place to manage staff and classes.
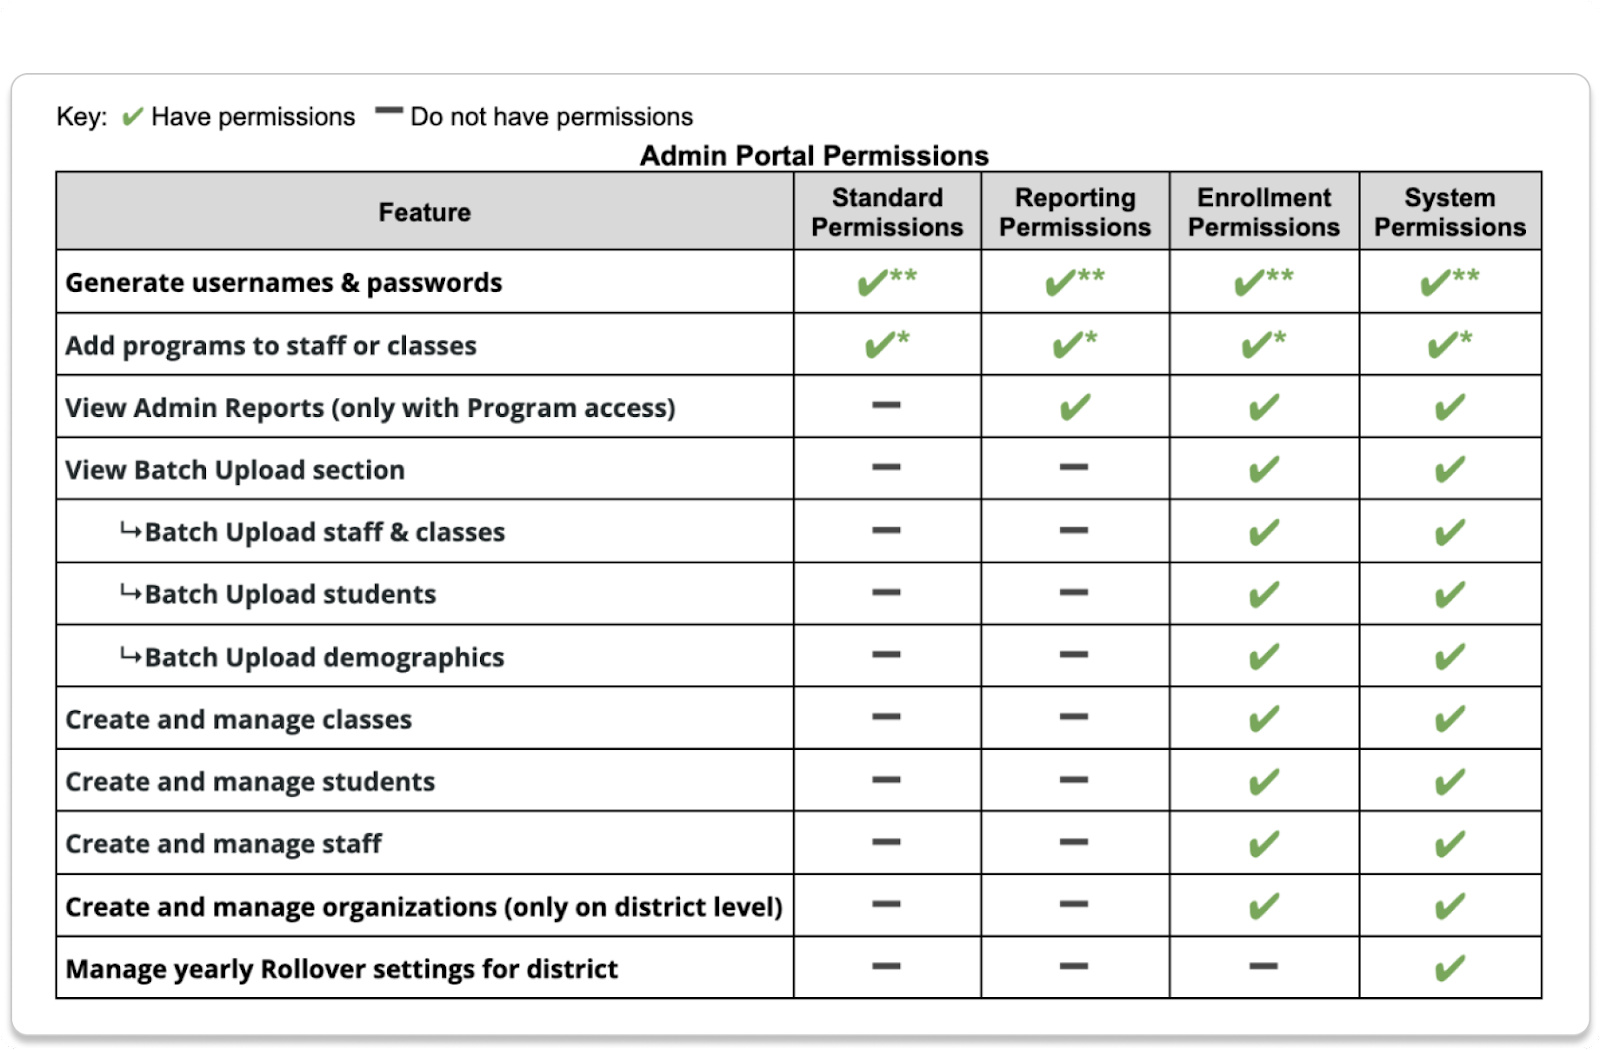
- Permissions
Certain permissions allow for more capabilities within Admin Portal.
- Standard Permissions: What everyone will see
- Users will be able to see their students and classes assigned to them.
- Users will be able to generate usernames and passwords for their classes.
- Users will be able to see rostering information for classes they are assigned to.
- Reporting Permissions:
- Users will be able to see reports at specific campuses or districtwide.
- Enrollment Permissions:
- Users will be able to upload names of staff, students, and classes (if Admin Portal is the enrollment source).
- Users will be able to manage staff and classes (if an external enrollment source like Classlink, Clever, GG4L is being used).
- System Permissions:
- Users will have reporting and enrollment permissions.
- Users will manage yearly rollover settings for the district (provided the user is enrolled at the district level).
- Users will set permissions for other staff members.
- License Management: For Amplify English Language Arts (ELA), CKLA, Caminos, Math, Science, or Boost Close Reading, the Amplify support team designates at least one licensed staff member at your district with the ability to provide access to classes as needed. Amplify will set up access to programs during the onboarding process for all programs, but License Members are given additional permissions to grant access if new classes are added or other users need access and were not granted access during onboarding.
- Boost Reading and mCLASS® are exempt from this, as access is granted for the programs to districts by Amplify upon setup.
- License Members have the ability to
- Receive programs and apply them to classes
- Access the programs independently from their assigned classroom
- Issue shared student and teacher logins when needed
- Shared Teacher Logins (modeled using Amplify Science): The Shared Teacher Login feature enables license managers to grant their teachers and other appropriate staff earlier access using a generic username/password. Please note that with these accounts teachers and staff won’t be able to save data, submit work, or provide feedback to students as the accounts will be shared across multiple users.
- Shared Student logins (modeled using Amplify CKLA): The Shared Student Login feature enables license managers to grant students earlier access using a generic username/password until their setup has been complete. Shared student logins provide digital program access to students who aren’t yet enrolled by their school or district. One shared student login is generated for each of your programs. This login is shared with all teachers who are associated with the license. Students will not be able to turn in classwork with the shared login credentials.
- Shared teacher and student logins are not available for mCLASS products. You can request a demo username and password from your Account Executive or our sales team until your enrollment is completed.
- Standard Permissions: What everyone will see
- Requirements
- Technical Requirements
- We recommend bookmarking this page.
- Network Requirements
- Technical Requirements
- Rollover
- The rollover process promotes students automatically to the next grade and dissolves all the classes created for the previous school year. No student data is lost during this process. Staff members will continue to have access to Amplify’s programs. Once rollover occurs, students will need to be placed in classrooms for the upcoming school year. Traditionally, the default rollover date for Amplify’s products is the third Friday of July. System Access Users at the district level will receive an email in May announcing the default rollover date. These users will have the ability to change their rollover date (usually from mid-June to August 22), so that summer programs are not interrupted. We advise selecting a rollover date around one week after your summer programs end, to ensure that all summer data is collected.
- Once a rollover date is selected, it cannot be changed.
- Once rollover occurs, the school year cannot be “rolled back” to the previous one.
- Make sure there is at least one System Access User at your district level to receive the notification email.
- After rollover occurs, you may begin enrolling your new students, including your kindergarten students.
- Your rollover date should not come after the day you plan to share your update rosters for the next school year.
- Have questions about Rollover at Amplify? Review this quick video <Link pending>
- The rollover process promotes students automatically to the next grade and dissolves all the classes created for the previous school year. No student data is lost during this process. Staff members will continue to have access to Amplify’s programs. Once rollover occurs, students will need to be placed in classrooms for the upcoming school year. Traditionally, the default rollover date for Amplify’s products is the third Friday of July. System Access Users at the district level will receive an email in May announcing the default rollover date. These users will have the ability to change their rollover date (usually from mid-June to August 22), so that summer programs are not interrupted. We advise selecting a rollover date around one week after your summer programs end, to ensure that all summer data is collected.
- Enrollment Options
Enrollment options Enrollment requirements for all enrollment sources - Authentication (logging in)
- Google SSO
- Use your district-provided Google email address and password to log in to Amplify. Google login is available for students, teachers, and school administrators.
- Clever Login
- With Clever login, you can sign into your Amplify programs with the same username and password used to access all your other online applications.
- If you’re already logged in to Clever, you can open Amplify from your district’s Clever portal.
- If you aren’t logged in to Clever and navigate to learning.amplify.com, you can use your Clever username and password to log in with Clever.
- ClassLink Login
- With ClassLink login, you can sign into your Amplify programs with the same username and password used for all your other online applications.
- If you’re already logged in to ClassLink, you can open Amplify from the ClassLink LaunchPad dashboard.
- If you aren’t logged in to ClassLink and navigate to learning.amplify.com, you can use your ClassLink username and password to log in with Amplify.
- Amplify Username/Password
- Enter your district username and password (provided to your district IT by Amplify).
- You (school/district) designate a System Access User. The System Access User can then generate usernames and passwords for staff and students.
- An Amplify username/password cannot be used for districts using Clever or Classlink for login.
- Help articles:
- Google SSO